Introduction
One of our clients recently approached us for assistance with recovering data from a laptop hard drive which had been encrypted using TrueCrypt.
A hardware repair gone wrong had led to problems booting the operating system and a variety of attempted fixes had been unsuccessful. They had already sent the drive to a specialist data recovery firm, who imaged the disk successfully but found the contents to be encrypted and couldn’t make any progress.
The laptop contained some business-critical data which hadn’t been backed up, so our client was understandably very keen to get it back. Because they were adamant that they knew the correct TrueCrypt passphrase, they still had the TrueCrypt Rescue Disk for the laptop, and the data recovery firm had confirmed that there were no problems with the drive at the physical level, we thought there was a good chance that we could help. It turned out to be an interesting job.
TrueCrypt
Most readers will be familiar with TrueCrypt, an open-source package that allows for encryption of entire disks, partitions, removable drives or container files, and might also have heard about the rather bizarre way in which the TrueCrypt developers pulled the plug on the project in early 2014.
Nonetheless, it is still in widespread use (including by our client, obviously), most experts still consider it to be secure, and there remains sufficient interest in it for a crowd-funded security audit to have recently been carried out by NCC Group’s Cryptography Services team.
Of course, our particular task here was not related to the “security” or otherwise of TrueCrypt – we had been given the correct passphrase, so we didn’t have to try to attack TrueCrypt’s cryptography in any way. We simply had to try to work out what had happened, and recover the original data.
The drive in question had the full-disk encryption (FDE) flavour of TrueCrypt installed. At a high level, this works as follows:
- The user supplies a passphrase, and a volume encryption key is randomly generated by TrueCrypt.
- A new master boot record (MBR) and bootloader are written to the first track of the disk.
- The volume encryption key – along with some metadata – is encrypted under a key derived from the passphrase to form a 512-byte volume header, and this is written to the final sector of the first track.
- All of the subsequent sectors on the drive are encrypted using the volume encryption key, in XTS mode.
Further details of the cryptography are available in the TrueCrypt documentation (which isn’t officially available any more, but you will find a version if you Google for it).
Note that the user can select the encryption algorithm to be used (AES, Serpent, Twofish, or a “cascade” of multiple algorithms), and the hash algorithm to be used in generating a key from the passphrase (RIPEMD-160, SHA-512 or Whirlpool).
Before the drive is encrypted, TrueCrypt forces the user to create a “rescue disk”, which is a CD containing a copy of the original contents of the first track, plus a copy of the new contents of the first track (i.e. the TrueCrypt MBR, bootloader, and volume header).
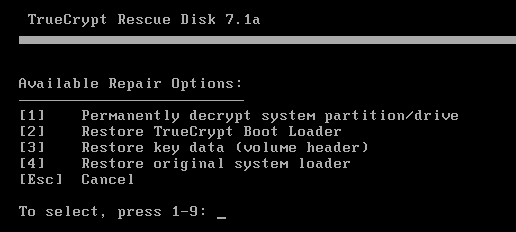
The idea is that this is kept safe (although it’s of little use to an attacker in itself, without the passphrase), because it might be useful if the drive suffers any corruption. By booting the encrypted machine from the CD, the user is presented with the following four “repair” options:

The last three of these options simply involve copying the relevant data from the CD to the hard drive. The first one requires the user to supply the passphrase, and then uses the copy of the volume header on the CD to derive the volume encryption key, and carry out a sector-by-sector decryption of the drive.
Timeline
Before the equipment was shipped to us, we asked our client for as much detail as they could provide on what had happened to the drive, and this is roughly what they told us:
- The laptop in question had a broken screen, so the IT department decided to transfer the drive to a new machine temporarily, while the screen was repaired. This was a process they had carried out successfully in the past.
- The drive had to be swapped back and forth a couple of times, in order to confirm some networking settings. At some point during this process, the operating system stopped booting successfully.
- Windows startup repair was used in an attempt to rectify the situation, but was unsuccessful.
- The TrueCrypt Rescue CD was retrieved, and the “decrypt drive” option was run successfully.
- Windows startup repair was attempted again, but still didn’t work.
- All the various recovery options available on the Rescue CD were attempted, still with no success.
- The drive was sent to a data recovery company, who were able to image it successfully, but found it to be encrypted, and couldn’t make any further progress.
This seemed strange – if the drive had been decrypted, then why did it still appear to be encrypted when it was imaged? We studied the timeline again, and something jumped out – had the decryption option on the Rescue CD been run twice? We went back to our client to ask, and they confirmed that indeed it had been (this had been done because even after the first successful decryption, the drive still prompted for the TrueCrypt password when booted).
One might think that running the decryption option on a drive that was already decrypted would have no effect, but our suspicion (which was quickly confirmed by checking the TrueCrypt source code) was that the decryption process would simply be executed again, regardless. If you encrypt some data with a symmetric algorithm, then decrypt it twice, you end up with something that is indistinguishable from encrypted data – that would explain what the forensic company had found. Fortunately, you can get back to the original plaintext by simply encrypting it again – this sounded like an approach that might work (although re-encrypting the data couldn’t be done using TrueCrypt itself, or with any other existing tools), so we asked our client to send us the drive.
“Decryption”
We imaged the hard drive and the Rescue CD, then dug out some old code for decrypting TrueCrypt volume headers and encrypted sectors.
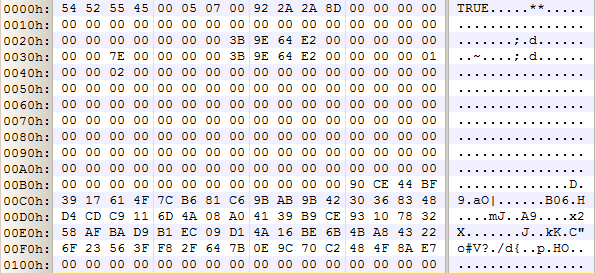
The final sector on the first track (sector 62) of the drive looked like a TrueCrypt volume header (a full sector of random-looking data), so we tried decrypting it using the password the client had provided. Success! The default hash algorithm (RIPEMD-160) and default encryption algorithm (AES) worked, and we had a plaintext volume header (indicated by the “TRUE” signature in the first four bytes, and of course the obviously non-random nature of the data). Here’s the volume header that we recovered (everything in the sector from 0x100 onwards is zero):

The volume encryption key is located at offset 0xC0 in this structure – it is 64 bytes long (that’s because AES-256 requires a 32-byte key, and XTS mode requires two AES-256 keys). We extracted this key (the bytes shown above are not the real ones from the drive!), and spent some time modifying our TrueCrypt sector decryption code so that it could also run the cipher in the opposite direction (based on our assumption that the drive had been decrypted twice). We copied the first “encrypted” sector from the drive (this was the first sector on the second track, as indicated by the 0x0000000000007E00 value at offset 0x2C in the volume header, which is the byte offset of the start of the encrypted data) and ran it through our tool. The output didn’t look right – it appeared to be random data, but we’d expect it to be an easily identifiable partition boot sector. Maybe we were wrong about the double-decryption thing, so we ran the tool in the normal “decryption” direction. Still nothing. We tried some different sectors from elsewhere on the drive – no luck. We tried running two decryptions, and two encryptions, without success. Maybe there was a problem with our code – XTS mode is pretty fiddly, and you have to make sure that you get the sector index parameter right. Trying some different values for that didn’t help. We installed TrueCrypt in a VM, and replicated the double-decryption scenario as closely as we could. Our approach – and the sector decryption code – worked fine on that.
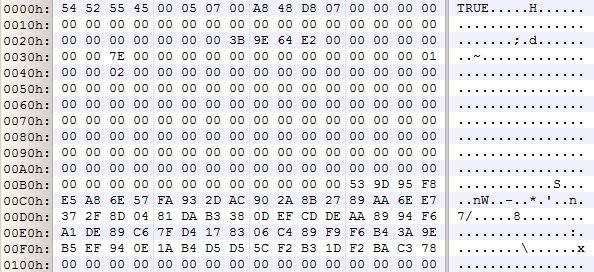
All very strange, and rather frustrating to have possession of the volume encryption key, but be unable to recover the original data. Running out of ideas, we took a look at the contents of the TrueCrypt Rescue CD that had been supplied. There’s a single file on there, and it starts with a backup of the TrueCrypt boot loader and volume header (i.e. the first 63 sectors from the drive). This volume header wasn’t the same as the one we had previously decrypted, so just to check, we ran the volume header decryptor again, with the same password, and once again it succeeded:

The volume encryption key from this header was different, which was unexpected. Of course, we immediately tried encrypting our first “encrypted” sector using this key, and – predictably enough, given how much time we had wasted messing around with the first key – it worked first time. The plaintext (or ciphertext, or whatever we should be calling it at this point!) was obviously a FAT boot sector (for an OEM recovery partition on the drive), and very pleased to see it we were too.
We set the tool running against the full disk image, and a few hours later had the original data back.
So what was going on with the two different volume encryption keys? On closer inspection of the disk image we had been supplied with, the first sector wasn’t the TrueCrypt master boot record, but was actually a standard master boot record, matching one which appeared in the Rescue CD image. Of course, one of the rescue disk options is to restore the original first track, and that must have been one of the last things that the technicians had attempted on the disk. So the first volume header that we decrypted had been the final sector from the first track of the disk, before TrueCrypt full-disk encryption was applied. The only possible explanation for why this would appear to be a valid volume header would be that some time in the past, the disk had been encrypted using TrueCrypt, then decrypted (with the final sector of the first track surviving this process), then encrypted again under the same password (but a different key). It didn’t matter much anyway – we had the original data back, our client would be happy, and that was (mostly) the end of that.
Untrue
We have tidied up the aforementioned code for checking passwords against TrueCrypt volume headers and decrypting the volume/disk contents, named it “Untrue”, and released it on the NCC Group GitHub page. Hopefully it will be useful to anyone with a TrueCrypt data recovery problem to solve.
There’s an existing tool called TCHead, which also checks passwords against volume headers, but its website seems to be down, and in any case, it offers no capability to decrypt the data.
There’s also some useful code (and informative blogposts) from Björn Edström, which is effective at checking passwords, but has only limited decryption capabilities.
Of course, neither of these tools have Untrue’s all-important -e switch, to run the ciphers in the wrong direction!
MFT woes
The story didn’t quite end there… when we triumphantly loaded the recovered disk image into FTK, it refused to have anything to do with the main NTFS partition on the disk. A bit of digging around revealed that the first four entries of the Master File Table (MFT) had been overwritten with random data, as had the backup copy of these four entries which is held in the $MFTMirr file. Given that these are well separated on the drive, and everything else appeared to be absolutely fine, this surely couldn’t have been an artefact from the processing we had performed. Presumably, this was actually the issue that had caused Windows to stop booting in the first place, or it was filesystem damage that had been caused during the attempts to fix things using Windows startup repair. Either way, it was a big problem, because the first entry in the MFT (named $MFT) provides information about where the various chunks of the MFT itself are located on the filesystem. Although the MFT begins at a location which is pointed to from within the NTFS boot sector, it grows and becomes fragmented as more files are added to the filesystem. Without information about these chunks, we’d have to do a time-consuming jigsaw process of trying to reconstruct as much of the original MFT as possible, by piecing together the bits that we could find.
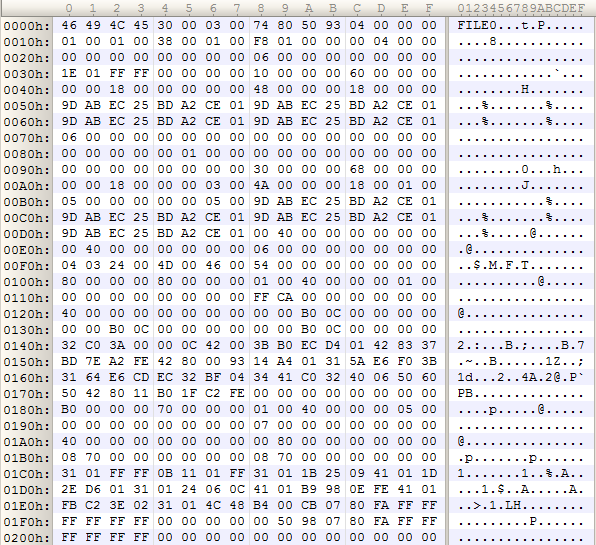
The hibernation file was our saviour. We found the MFT entry for hiberfil.sys (this hadn’t been corrupted, as it isn’t one of the first four entries in the MFT). The timestamps in this MFT entry suggested that the laptop had been hibernated very recently. Surely the first entry in the MFT would have been in RAM when the system was hibernated? (e.g. in the NTFS driver’s pool, amongst other places). Using the run data in the MFT entry, we were able to manually extract the hibernation file, and decompress it using the fantastic Volatility framework. Searching through the resultant memory dump for MFT entries with a file number of zero (simple enough, given that MFT entries start with a “FILE0” signature, and have their file number at offset 0x2C) we found what we were looking for – the $MFT entry, with the all-important information about the MFT’s “runs” at bytes 0x140-0x178.

After patching this in to the correct place in the disk image, the forensic tools were happy again, and we were done.
Conclusions
What are the lessons we learned from this?
- Our client should, of course, have had their data backed up. But hands up those who have a reliable and regular backup strategy for data on laptops. Anyone?
- The TrueCrypt Rescue CD is useful in a crisis – make sure you don’t lose it. However, it is certainly not user-friendly – a DOS-style interface with a set of forbidding-sounding options. Before going down this route, read the documentation first, and try to understand as much as possible about the problem you are trying to solve.
- The TrueCrypt Rescue CD should not decrypt data which has already been decrypted! At the very least, it should perform some simple heuristic tests to determine if the data it is being asked to decrypt actually looks like ciphertext, with a warning to the user if not. This would have saved our client a whole lot of bother. We hope this suggestion will be helpful to the projects that are working on successors to TrueCrypt.
Published date: 17 April 2015
Written by: Richard Turnbull
